

Competition Beef Brisket

For the past couple of years I have been competing in Kansas City Barbecue Society competitions up and down the east coast. Ever since I have started people have been asking me for a competition style recipe. Well here is my brisket recipe.
Competition Brisket
The first thing required is a packer brisket. They are sold at big box stores, butcher shops, and Walmart. I purchased a nice 18lb choice brisket at Walmart.

Open up the cryopac and you will notice that the edges are a little grey. It is perfectly fine. You will trim them off. You will also notice that the brisket is covered in fat. Once again you will trim that off.

The brisket is two separate pieces of meat that are connected together. In the picture below you will see the leaner flat on the left of the brisket and the fattier point on the right of the brisket. The two separate muscles with various fat contents is why the brisket is a tad bit difficult to cook. However, with this tutorial, you will cook a mean brisket no problem.

Starting on the side opposite of the thick fat cap, remove all of the fat and silver skin from the flat. You want to get right down to the meat. That way your brisket will have rub on the surface. If you don’t remove the fat and membrane, then you may not get the flavor penetration that you want. You also want to remove as much of the thick fat from the point as possible.

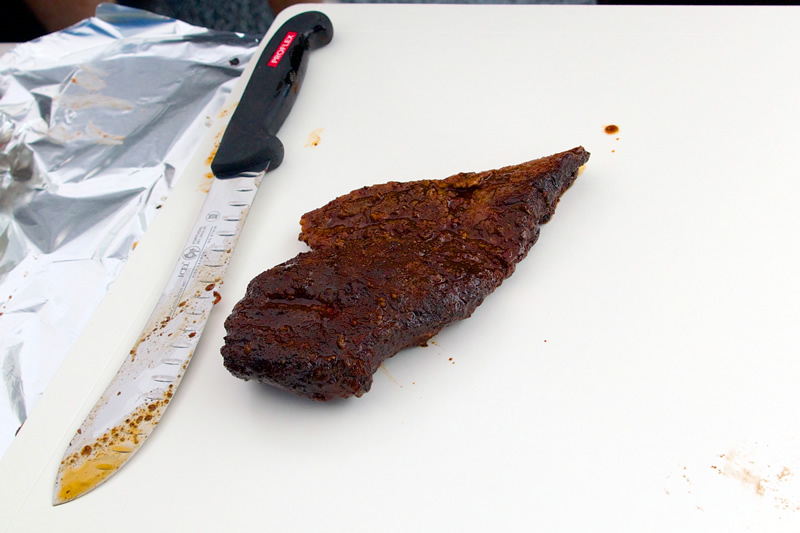
Flip over the brisket and remove the remaining fat from the point. Make sure to leave the fat cap on the flat. Flip the meat back over and cut the corner of the flat that runs perpendicular to (against) the grain of the meat. Once cooked you will look for the cut corner to know which direction to cut the flat. It is best to cut the flat against the grain. Finally cut the edges straight, trimming off any of the grey parts.

Place the brisket in a shallow pan, fat cap down and coat with my basic bbq rub. Make sure to do an even coat. Also coat both sides of the point.

Split the brisket injection in half. Place half in the refrigerator and inject the brisket with the other half. Inject the flat every inch and then inject the point with as much as you can. If all of the injection does not fit into the brisket pour the rest around the edges. Refrigerate or keep on ice for at least 4 hours before cooking. I have injected the day before, so do not worry about doing it too far in advance.

Preheat your smoker to 250 degrees Fahrenheit.
I first set up the Weber for offset cooking. To do this I placed two firebricks lengthwise down the middle of the grill. Then I put about 8 lbs of unlit charcoal on one side. Then I lit 7 brickets and placed them on one end of the pile. This is a slow minion method that will produce just enough heat for about 10 hours. I then placed a few wood chunks throughout the pile. I wanted the offset side to read at about 250 degrees.

Once you have your smoker at a steady temperature, place the meat on. If you can place the point toward the firebox/heat source.
Cook for about 5 hours or until the internal temperature reaches 165 degrees. At this time we are going to wrap the brisket. On a flat surface place a couple layers of heavy duty aluminum foil down. Place the brisket on top. The pour the remaining brisket injection around the brisket and over the point. Do not pour the injection over the flat as it will wash away the rub. Then lightly dust the top of the brisket with a little more basic bbq rub. Then close the foil around the brisket.

Cook for another 3-5 hours or until the temperature reaches 185 degrees. At this point check the flat with a skewer or probe thermometer. If the skewer or probe slide through the brisket like a hot knife through butter then it is done. If it does not then continue cooking and continue checking for doneness every 20 minutes.
I have had briskets done at temperatures as low as 185 and as high as 208. This is where a little skill comes in. You don’t want to pull it at a specific temperature. You want to pull it when it is done. Every brisket is different.
When the brisket is done remove it from the smoker and vent the foil to let steam escape for about 15 minutes. Then tightly re-wrap the foil. Cover the brisket with 3-4 towels and place it into a cooler for at least 1 hour to rest. Trust me it will still be piping hot after three hours. The brisket needs time to rest and since you vented the meat, it stop cooking, but it maintain its current temp.
After your brisket has rested remove the brisket and cut the point away from the flat. You will see a prominent fat layer between the two separate cuts. Just slice the brisket at the fat layer. Cover the flat with foil. Re-wrap with towels and place back into the cooler.

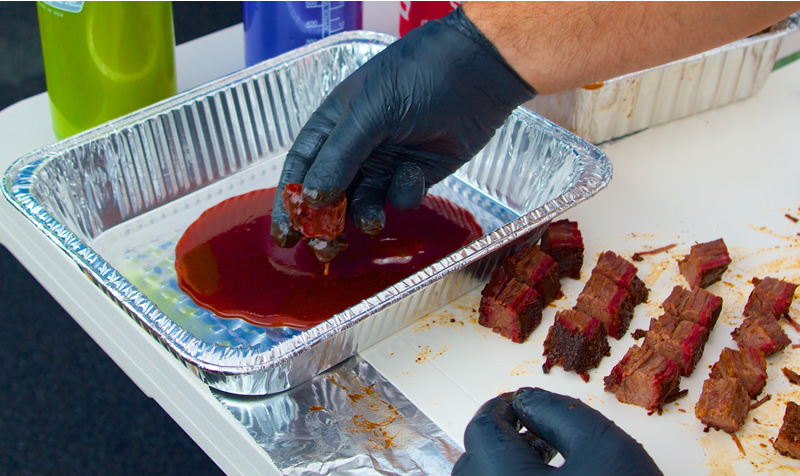
Time to make some burnt ends.

Place the point onto a cutting board and cut it into 3/4 inch cubes. Coat with my basic bbq sauce, dust with a little more basic bbq rub and then place the cubes in a foil pan. Cover and place back onto the smoker for another 30-60 minutes.

When the burnt ends are done, remove and serve. At this time remove the flat and slice against the grain. Make slices that are about the width of a pencil.

At this time you can coat the slices with a little brisket glaze. (1 part basic bbq sauce, 2 parts water)

Plate and serve.

Ingredients
Method
- The first thing required is a packer brisket. They are sold at big box stores, butcher shops, and Walmart. I purchased a nice 18lb choice brisket at Walmart.
- Open up the cryopac and you will notice that the edges are a little grey. It is perfectly fine. You will trim them off. You will also notice that the brisket is covered in fat. Once again you will trim that off.
- The brisket is two separate pieces of meat that are connected together. In the picture below you will see the leaner flat on the left of the brisket and the fattier point on the right of the brisket. The two separate muscles with various fat contents is why the brisket is a tad bit difficult to cook. However, with this tutorial, you will cook a mean brisket no problem.
- Starting on the side opposite of the thick fat cap, remove all of the fat and silver skin from the flat. You want to get right down to the meat. That way your brisket will have rub on the surface. If you don't remove the fat and membrane, then you may not get the flavor penetration that you want. You also want to remove as much of the thick fat from the point as possible.
- Flip over the brisket and remove the remaining fat from the point. Make sure to leave the fat cap on the flat. Flip the meat back over and cut the corner of the flat that runs perpendicular to (against) the grain of the meat. Once cooked you will look for the cut corner to know which direction to cut the flat. It is best to cut the flat against the grain. Finally cut the edges straight, trimming off any of the grey parts.
- Place the brisket in a shallow pan, fat cap down and coat with my basic bbq rub. Make sure to do an even coat. Also coat both sides of the point.
- Split the brisket injection in half. Place half in the refrigerator and inject the brisket with the other half. Inject the flat every inch and then inject the point with as much as you can. If all of the injection does not fit into the brisket pour the rest around the edges. Refrigerate or keep on ice for at least 4 hours before cooking. I have injected the day before, so do not worry about doing it too far in advance.
- Preheat your smoker to 250 degrees Fahrenheit.
- I first set up the Weber for offset cooking. To do this I placed two firebricks lengthwise down the middle of the grill. Then I put about 8 lbs of unlit charcoal on one side. Then I lit 7 brickets and placed them on one end of the pile. This is a slow minion method that will produce just enough heat for about 10 hours. I then placed a few wood chunks throughout the pile. I wanted the offset side to read at about 250 degrees.
- Once you have your smoker at a steady temperature, place the meat on. If you can place the point toward the firebox/heat source.
- Cook for about 5 hours or until the internal temperature reaches 165 degrees. At this time we are going to wrap the brisket. On a flat surface place a couple layers of heavy duty aluminum foil down. Place the brisket on top. The pour the remaining brisket injection around the brisket and over the point. Do not pour the injection over the flat as it will wash away the rub. Then lightly dust the top of the brisket with a little more basic bbq rub. Then close the foil around the brisket.
- Cook for another 3-5 hours or until the temperature reaches 185 degrees. At this point check the flat with a skewer or probe thermometer. If the skewer or probe slide through the brisket like a hot knife through butter then it is done. If it does not then continue cooking and continue checking for doneness every 20 minutes.
- I have had briskets done at temperatures as low as 185 and as high as 208. This is where a little skill comes in. You don't want to pull it at a specific temperature. You want to pull it when it is done. Every brisket is different.
- When the brisket is done remove it from the smoker and vent the foil to let steam escape for about 15 minutes. Then tightly re-wrap the foil. Cover the brisket with 3-4 towels and place it into a cooler for at least 1 hour to rest. Trust me it will still be piping hot after three hours. The brisket needs time to rest and since you vented the meat, it stop cooking, but it maintain its current temp.
- After your brisket has rested remove the brisket and cut the point away from the flat. You will see a prominent fat layer between the two separate cuts. Just slice the brisket at the fat layer. Cover the flat with foil. Re-wrap with towels and place back into the cooler.
- Time to make some burnt ends.
- Place the point onto a cutting board and cut it into 3/4 inch cubes. Coat with my basic bbq sauce, dust with a little more basic bbq rub and then place the cubes in a foil pan. Cover and place back onto the smoker for another 30-60 minutes.
- When the burnt ends are done, remove and serve. At this time remove the flat and slice against the grain. Make slices that are about the width of a pencil.
- At this time you can coat the slices with a little brisket glaze. (1 part basic bbq sauce, 2 parts water)
- Plate and serve.
Notes
Aluminum pans are great as they don't need cleaning
If you do not have heavy duty aluminum foil then use 4-5 layers or regular foil.


I have a picnic shoulder on the grill right now….wishing I had done a brisket too 😉
I have a brisket with the bone on it. It's big. It's about 14" x 14" Should I cut the bone off or cook it and let the bone fall off. Ohhhhh. My first attempt to cook a brisket.
Donna I would probably cut it off the bone. I have cooked one on the bone and it came out great, but there was no bark. You need to cut of the bone in order to have a place to attached the rub.