
 by
by
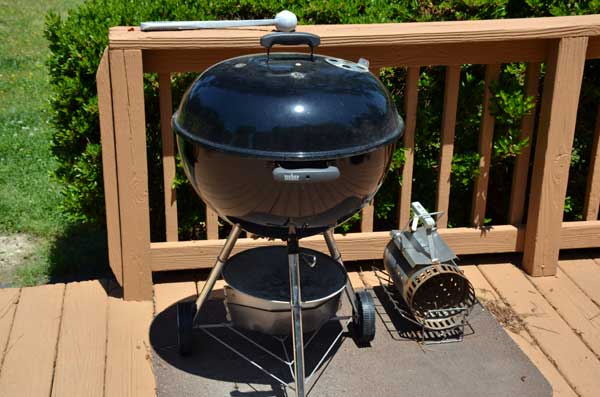
I love my Weber charcoal grill.  It is quite possibly one of the best outdoor cooking devices out there.  Although it is labeled a grill, it can grill, bake and smoke with little to no effort.  It is the Swiss army knife of grills.  The bonus is that you can pick up this amazing grill for under $100.  This grill has a perfect design that allows for it to be turned into an amazing smoker!  With little to no effort it can keep 250-275 degrees for 8 hours or more.  You can’t do that with any smoker for under $120.  Turning your Weber charcoal grill into an awesome smoker is really simple.  There are two methods to choose from.  I prefer the firebrick method, but if you can’t find a few bricks, the aluminum pan method works great.
Method One – The Firebrick Method – (Preferred Method )
Needed Supplies:
- Weber One-Touch Charcoal Grill
- 2 Firebricks
- Charcoal
- Charcoal Chimney
- Smoking Wood Chunks
- Surface grill thermometer
- Half-Pan Aluminum Pan (optional)
You can purchase firebricks for pretty cheap at any Masonry Supply House. Â The big box stores charge you an arm and a leg, for the same bricks that you can pick up for around $1 at a Masonry Supply House. Â You can find a Masonry Supply House in your local yellow pages. Â Search for masonry, brick or stone yard. Â Call ahead and ask for fire bricks.
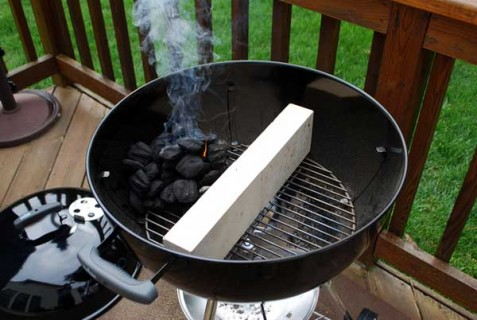
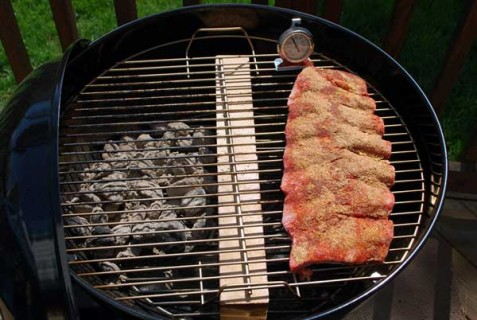
Once you have acquired two Firebricks, place them end to end in the center of the grill. Â This will split the charcoal grate into two separate halves.
Fill one half with unlit coals and smoking wood chunks. Â I fill the side pretty full, almost to the height of the firebrick. Â Place 4-6 chunks of wood throughout the coals and you will be set. Â Then create an opening at one end in which to add hot coals.
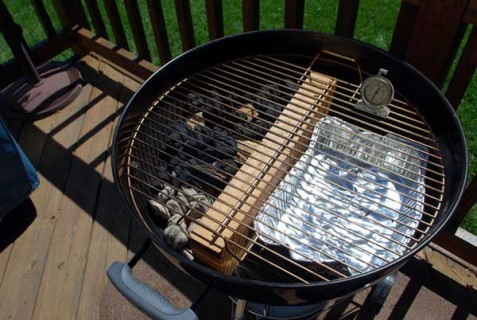
The other half of the grill on the opposite side of the firebrick will be open. Â However, you can put the optional half-pan in the other side to catch grease and make clean-up easier. Â However, if you do not have the half pan you will be fine. Â You can even add a liquid to the pan to enhance the flavor. Â Try beer, juice or water. Â Once again, this is not necessary but an added bonus.
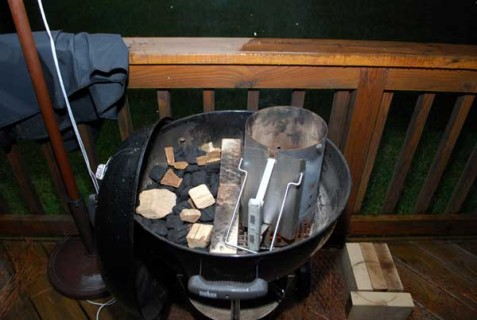
In a charcoal chimney light 8-10 coals till they have grayed over. Â Once they are ready, place them into the opening that you created. Â I know what you are thinking, 8 coals is not enough. Â However, this is all you need. Â If you light more you will have too hot of a fire. Â The fire will slowly burn across the unlit coals and keep you smoking without any effort.
Once you have added the coals place the grate onto the grill. Â Then place the surface thermometer on the indirect side of the grill.
Close the bottom damper to just barely open and close the lid damper to just barely open. Â Wait 5 minutes for the grill to come to temperature, remove the lid and check the thermometer. Â If the temperature is under 250-275 then open the bottom damper a little more. Â If the temperature is too hot, close the bottom damper a little. Â Keep checking until you get a steady temperature.
Once you have the temperature steady add your meat and you are ready to smoke. Â Every hour of so you can check the thermometer and adjust the damper, but usually it is not necessary. Â The only caveat is if it is raining or windy. Â These two factors will make the temperature fluctuate a bit.
I have found that this method will burn continuously for about 8 hours.  At that time you will need to add more wood chunks and more charcoal.  A tip is to upgrade to a hinged grate from Weber.  That way you can just open the hinge and add more wood.  Just make sure that you arrange the grate so that the hinge is over the coals.  If you opt for a Weber One-Touch Gold ($149) instead of the the Weber One-Touch Silver ($99) you get a hinged grate included.
Using this method you can cook two pork butts, two racks of ribs or one packer brisket. Â If you add a rib rack you can cook up to 4 racks of ribs. Â More than enough ribs for a family.
Method Two- The Aluminum Pan Method
Needed Supplies:
- Weber One-Touch Charcoal Grill
- Charcoal
- Charcoal Chimney
- Smoking Wood Chunks
- Surface grill thermometer
- Half-Pan Aluminum Pan
- Water, Juice or Beer!
Place the Aluminum Half Pan on one side of your grill. Â Fill the other side with unlit coals and wood chunks.
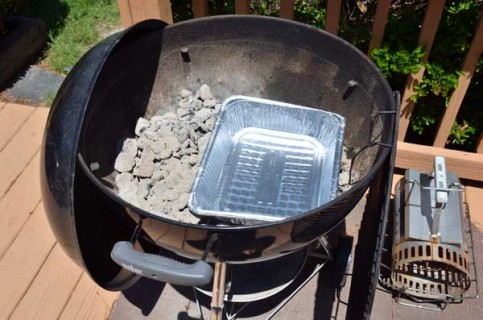
Then Fill the Aluminum Pan halfway full with your favorite liquid of choice. Â I like to use apple juice, beer or even water. Â This will act as a heat shield and the steam will be a tenderizer/flavor enhancer.
In a charcoal chimney light 8-10 coals till they have grayed over. Â Once they are ready, place them into the opening that you created. Â I know what you are thinking, 8 coals is not enough. Â However, this is all you need. Â If you light more you will have too hot of a fire. Â The fire will slowly burn across the unlit coals and keep you smoking without any effort.

Once you have added the coals place the grate onto the grill. Â Then place the surface thermometer on the indirect side of the grill.
Close the bottom damper to just barely open and close the lid damper to just barely open. Â Wait 5 minutes for the grill to come to temperature, remove the lid and check the thermometer. Â If the temperature is under 250-275 then open the bottom damper a little more. Â If the temperature is too hot, close the bottom damper a little. Â Keep checking until you get a steady temperature.
Once you have the temperature steady add your meat and you are ready to smoke. Â Every hour of so you can check the thermometer and adjust the damper. Â This method requires a little more fire tending than the firebrick method, but it is not that much more. Â Once again, the only caveat is if it is raining or windy. Â These two factors will make the temperature fluctuate a bit.
I have found that this method will burn continuously for about 6 hours.  At that time you will need to add more wood chunks and more charcoal.  A tip is to upgrade to a hinged grate from Weber.  That way you can just open the hinge and add more wood.  Just make sure that you arrange the grate so that the hinge is over the coals.  If you opt for a Weber One-Touch Gold ($149) instead of the the Weber One-Touch Silver ($99) you get a hinged grate included.
Using this method you can cook two pork butts, two racks of ribs or one packer brisket.  If you add a rib rack you can cook up to 4 racks of ribs.  More than enough ribs for a family.
This is the cheapest and most economical way to make smoked meat at home. Â I know that there are some cheap charcoal smokers out there, but they do not compare the ease and effectiveness of the Weber one-touch.
Now that you have set up your smoker, try one of these great recipes.
- Smoked Chicken Drumsticks
- Pulled Chicken
- Competition Beef Brisket
- BBQ Rub
- Beef Ribs
- Bacon Wrapped Smoked Meatloaf
- Breakfast Fatty
Happy smoking. Â As always, if you have any questions leave a comment below or click the Ask Rex link in the menu bar above.
I personally like something that I’ve seen referred to as the “Ring of Fire” or “Minion method”. This is where you put a string of brickettes, piled 2-3 wide and 2 tall, around the outer edge of the kettle, about 3/4 of the way around. you put an aluminum pan full of water in the middle, and light one end of the brickette “snake”. Position wood chunks on top of the brickettes about every 4-5 inches. Place the meat above the foil pan.
I have held very stable temps around 225-275 for up to 9 hours with this method, without adding any additional coals…simply adjusting the vents if necessary…but once you dial it in, it’s almost “set it and forget it”.
JB – The ring of fire is great method too. Thanks for posting the details of it. That goes to show that the Weber is a great smoker and can be used multiple ways to accomplish a single task. The Swiss army knife of the backyard. I have used this method in the past, but the problem I have found with it is that I find it hard to cook a lot of meat on it. It works great for a single butt or a chicken, but when you want to cook a whole packer brisket or a couple of butts, the ends get scorched. The best part of the Weber is that whatever technique you use it is almost set it and forget it. Thanks again for the comment.
I agree, the Weber Kettle is genius in its simplicity.
Once again, you’ve explained everything step by step. Great post!
I like to keep the top vent over the side of the food, to help draw the airflow and smoke in that direction.
Thanks Brian. I agree about keeping the vent over the food. I thought I uncluded that in the post. I will have to amend the post to include that. Thanks again.
Rex
I am so excited to use your idea for smoking meat on a Weber grill, especially for the holidays!
My boss smoked a turkey for the office Thanksgiving Potluck. It was the best turkey I’ve ever had. I’m comparing it to Thanksgiving Turkey at the Ritz-Carleton in Cleveland OH. That was THE best TG meal I’ve ever had. I have set up the Weber grill with the fire bricks, the turkey is brining and the wood chips / charcoal are ready. I need info on how to safely smoke my 20 pounder. I like the idea of smoking it as long and slowly as I can. Should I use Morton Tender Quick preservative salt in the brine for a turkey that large? Should I spatchcock it? I want to duplicate the turkey we had at the office, for my family. Thanks for the awesome food and beverage ideas shared on your site.
Shane in MN
Shane,
I am glad you found the post. I would definitely spatchcock the turkey if you are going to put it on the kettle. Otherwise it will be too tall. I don’t have instructions on the site yet to spatchcock a turkey, but the structure is the same as a chicken. So here is my step by step on how to spatchcock a chicken. https://savoryreviews.com/2013/02/22/spatchcock-chicken-smoked-to-perfection/
I don’t use tender quick when I brine as I find it makes the end product too salty. This is my go to brine for turkey. https://savoryreviews.com/2010/11/15/how-to-brine-a-turkey/
Here is also my smoked turkey recipe. https://savoryreviews.com/2010/11/17/how-to-smoke-a-turkey/
Since turkeys are larger than chickens, I would rotate it half-way through so that one side does not cook faster than the other. Especially if you are cooking on the kettle.
Hope this helps,
Rex
Thank you for great visual and written instructions. Come Spring i am going to try this. I have always knew there was a way to smoke on a charcoal grill.